Sunday, January 19, 2014

Table Recycle

After finishing the cabinetry in the kitchen, Mitch and I decided we needed a small table to help fill the room. Luckily for us, his mother had recently "donated" an small round table to our garage. I decided I wanted to add a pop of color and a pattern so off to Hobby Lobby I went to 
find the perfect stencil.

The stencil itself is about 16"x16" and cost me approximately $16 at Hobby Lobby.


 The next thing I needed to do was sand down the table top as it had been finished with a polyurethane. I sanded down the top with a coarse grit sandpaper and then after the majority of the stains were lifted and the finish was removed, I switched to a ultra fine grit paper. 


Since there were stains deep in the wood I was unable to sand out, I decided to place my pattern in a way to cover the majority of the spots. 


I used a measuring tape to make sure my stencil was straight since my table was round. I grabbed double stick tape to help me keep the stencil in place as I painted. Eventually, I got bored waiting for the paint to dry, so I brought out my hair dryer to speed up the process. 


As the paint dried, I lifted the stencil slowly and it up by overlapping a small portion of the already painted pattern. Then I waited. 


After I couldn't wait any longer, I selected a stain and covered the table surface with a thin layer. I used a dry cloth to wipe off the excess and let the table dry. During my process of sanding, I apparently did not get all the previous finish off as my stain only took in certain areas. I liked the look however, since it gave the table an added dimension and more texture... so I continued my 
process of staining. 


 I was quite happy with my results until I got my finished project inside... The stain and caused the white vibrant paint to turn a creamy brown in color. Under normal conditions I wouldn't have minded this unintentional change. However, against our newly painted white cabinets, it just made the table look dirty. So I headed back to the drawing board. 

I decided to take the ultra fine finishing sand paper and lightly sand the top of the paint. My plan worked too! The dingy looking top layer of paint came right off and I was left with a bright white pattern on top of my table.


Lastly, to seal the wood and keep from having the paint scratched off , I added a coat of polyurethane. The final step in finishing my table will be to paint the legs... That, however, will be determined after I decide what color I'm going to paint the kitchen! 

Happy Crafting
-Melanie

Friday, January 17, 2014

Kitchen Cabinet Make-Over

A lot has happened in the last few months in our home.

Biggest accomplishment: I graduated from nursing school with my RN!

Next biggest accomplishment: We re-painted all the kitchen cabinets

(ignore the fact the drawers have not been put back in this photo!)

Let me tell you, this was the longest and hardest project we have done so far in our home. Our kitchen started out with ugly cabinets (see photo below) that made the room look small and dark. Our next door neighbors have the same kitchen layout and re-finished their cabinets in a dark chocolate brown. After seeing how their kitchen turned out, Mitch and I decided to take the opposite approach and paint the cabinets white to match the trim in the rest of the house. 


To start we had to take everything out of the cabinets and take off the doors/hardware. We moved the appliances and covered them so they wouldn't get so dirty during the rest of the process. Our neighbors said they used some sort of spray cleaner on all the cabinets so they didn't have to sand everything. Mitch and I decided, however, that our cabinets needed to be sanded as there were a lot of dings and dents in the wood. So the process began. 


Yes, this is the same room! Ah! So much chaos in this photo! During the process of painting in the kitchen, Mitch and I decided to buy a new refrigerator. Due to the size of the fridge, we had to move some appliances around.


After removing EVERYTHING we began to sand... and sand... and sand. Never in my life has a work-out at the gym made my arms hurt as much as they did from sanding.


Never in my life have my fingernails taken such a beating either!


Next step was to give the doors an update. Mitch and I picked up some simple trim from Menards and cut/glued/nailed it to the front of each door to add a boarder. Mitch even let me use the power tools!! In fact, I spent most of my days cutting the trim while Mitch was at work and in the evenings we had a system for gluing and nailing down each piece.


Paint! Paint! Paint! That's what came next! 

Mitch ended up buying an electric spray gun to eliminate brush strokes and evenly apply the paint. I think he liked the gun for the project, but after doing several other painting projects with an array of other spray guns, I don't think he will use it again. He says he would rather use an air gun connected to an air compressor. (I'll check and see what the brand/name is of the gun he didn't like) For paint we used a color called white chocolate, but honestly, I can't remember the brand of the color swatch. I had so many color options from different stores so I just made Lowe's match the paint swatch I liked. I made sure it was a high gloss specifically for kitchens and bathrooms. I think having the high gloss helps with wiping down spills. 


Mitch re-applied all the doors after letting the paint cure for 3 days. In the center of one of the cabinet doors, we chose to put chalkboard paint to keep track of needed groceries/supplies. The door we chose happened to be above the microwave. We didn't like how chalk dust fell on top of the microwave and ended up re-painting the door with dry-erase paint.


Now Mitch feels the need to leave me silly photos for holidays and special events rather than using the dry erase board for it's intended purpose: groceries/supplies.

Next decisions to make: 
1. room color
2. pendent light colors
3. accent wall?

Happy Crafting
-Melanie

Tuesday, September 10, 2013

The Proposal

So, it finally happened... Mitch proposed. :)


I wont lie, it was completely unexpected... but about dang time! 
So with that said, I've been busy starting the wedding planning! At the same time, I've started my final semester of nursing school so I've been entirely overwhelmed. I hardly have time to pee! ... and yes, I realize I've slacked off the last few months and haven't posted any new blogs lately... but I'll get right on that as soon as I finish some homework!

So here's a few more photos from our vacation/engagement in Pass-A-Grille, Florida!


Until next time, happy crafting!
-Melanie

Thursday, May 9, 2013

Medicine Cabinet Face Lift


 As you know, Mitch and I have been updating our new home. My recent undertaking consisted of giving our upstairs bathroom's medicine cabinet a face lift. Since we started painting the trim in our house white, the wooden cabinet looked a little out of place.


The above picture gives you a 'before' glimpse. You can see the pink wall color needed to go, and ASAP! What you don't see is the disgusting wallpaper boarder we had to scrap off the top of each wall. ICK! So anyway, something had to be done...


What you'll need:
*paint
*paint tape
*paint brush
*contact paper
*tape measure
*X-acto knife or box cutter
*razor blade scraper
*lots of patients

I started off sanding all the wood, taping around the cabinet as not to get paint on my NEW grey walls, and painting the inside portion of the cabinet that wouldn't be covered with contact paper. See the wooden pieces covering the ends of each mirror at the top and bottom? Don't worry about taping that part of the mirrors off when you're ready to paint. Several expert painting sites suggest it's a waste of tape and time. The paint scrapes right off with a razor blade scraper.


Here's a razor blade scraper if you aren't exactly sure what they are... Mitch had no idea what I wanted him to buy when he ran to Menards... so naturally I had to go back and this is the one I bought for roughly $4.  


I had previously selected contact paper (as mentioned in my post Fashionably Hide Your Toilet Paper). I got mine at TJ Maxx for $5.99. I had some issues with this well-constructed cabinet--I was unable to take the mirrors off. This left me with the dilemma of being unable to take the shelves out. ugh! I had to put the contact paper in by using long skinny strips instead of one giant piece. This probably wouldn't have been such a big deal, but I chose contact paper with an intricate design. Lining everything up was a pain!

I started by measuring the width of the inside of the cabinet and the distance between each shelf (which varied in my case). I cut the first strip of contact paper, put it inside, and placed it where I needed it to be. 


Now for the hard part... peeling off the back and making the contact paper stick without having air bubbles all while keeping it lined up with the bottom of the cabinet. I started by peeling the contact paper backing up as I smoothed the sticky side down to the cabinet


This video shows the process if you need more of a visual aide. 


The first strip of contact paper wasn't as difficult as the rest because I didn't really have to line anything up except making sure the contact paper stayed in a straight line.
 
 
 Once reached the right side of the cabinet, I found I had cut my contact paper about 1/4 inch too long. Simple fix. I just took my box cutter and trimmed off the excess.


 I kept working in small sections all the way to the top of the cabinet making sure I had the pattern lined up and my seams were behind the shelves. 


After several hours of tediously painting and lining up the patter of the contact paper... and several days in between... I finally finished my medicine cabinet face lift. I think it turned out quite swell. I hope yours does too! 


Happy crafting!
-Melanie

Wednesday, May 8, 2013

Propogating Succulents Part 2

Hey! Remember when I said it takes a few days to several weeks for your succulent leaves to grow roots? Well, here's an update on the leaves I set on the windowsill clear back in April. 


This is the original leaf I took a photo of and is pictured on the other blog. It took a whole month of sunshine for roots and a new baby succulent to start growing. Granted, I live in Iowa and we didn't exactly have a normal month of April. It was rather cold and snowy, warmed up for a few days, then Mother Nature decided to have fun with us and give us some more snow! The first part of May was underway and she decided to give some parts up north 15 inches of snow!! What a cruel joke! Anyway, this process, like with other growing plants, takes longer in cool/cold weather and speeds up during warmer months. Below are other succulent leaves I placed on the windowsill at the same time. As you can see, 2 sprouted roots/plants, one shriveled up and died, while the last two have yet to produce any roots.


Happy crafting!
-Melanie

Tuesday, April 23, 2013

Herbs

I'm just so excited... My babies are growing!!


And Mitch finally decided to re-pot his cactus after 2 years.

Wednesday, April 17, 2013

Propogating Succulents

Propagating succulents is a new endeavor of mine; it's actually quite simple too! My passion for these little buggers started while I was scrolling through page after page of wedding planning ideas on Pinterest. So what did I do? I constantly found myself wandering around the local plant centers... looking online at nurseries... all just to find the perfect succulent! Eventually, I gave up. Most of what I saw in stores were partially dying, scraggly, too expensive, etc. Then I remembered an old roommate of mine had succulents in pots in our kitchen. She would often forget to water them and leaves would fall off onto the floor. When time came to sweep the floor, I remember picking up a leaf that had started growing a little baby plant from roots it had sprouted. I thought to myself, "challenge accepted!" I was going to snatch a leaf and try to grow my own plant--and it worked!! So here's what I did...

I started with a single leaf. 


The end portion of the leaf where the stem connects needs to "heal" for a few days before anything can be done with the leaflet. I just set the leaves on the windowsill in the living room where there's good lighting. 


 After a few days... sometimes weeks if I forget, I come back to check on my leaves. Some leaves will already have started to sprout roots (from the end that connects to the stem), while others need a little extra help. To "help" out, I place a paper towel in the bottom of one of those plastic containers you put your pots... you know, the ones that catch all the soil drainage so it doesn't leak all over your house. Then I place my leaflet on the paper towel and every few days dampen the paper towel. Anyway, I don't have a picture of that step since my leaf had already sprouted roots.


Once roots have started growing, I set the leaf on top of soil and let the roots do their magic. I've heard some species of succulents propagate from areas other than whats pictured. I'll have to play around and let you know. 

You can propagate several leaves and species of succulents at a time and organize them in pretty patterns in your pot. I'm probably going to end up re-potting mine since I only did a leaf or two at a time and they're all the same species. I hope to eventually end up with something like this.

photo courtesy of http://gwynneburgess.com

 But for now, this is the beginning of my new hobby!


 Happy crafting... and propagating! 
-Melanie


Saturday, April 6, 2013

Re-Purposed T-shirt Yarn: Take 2

So yesterday I talked about turning a t-shirt into yarn. Today I'll show you another method of making t-shirt yarn just in case you messed up the first time around or prefer a different method. Make sure to refer to the other post in case you have questions as my directions are much more detailed than in this one.

You start out the same... lay out the t-shirt, cut from armpit to armpit and cut off the bottom hem.


Next, fold the body portion of the shirt in half from side to side. In the previous blog I said to leave about an inch of un-overlapped area to make a long connected strand of "yarn." For this method, you can simply fold the t-shirt completely in half... If  you happened to mess up and cut all the way through the t-shirt, you can pick up from this step.


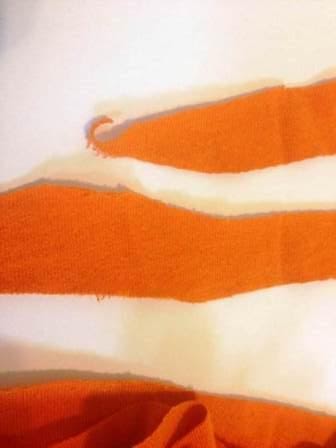
Cut the t-shirt in approximately 1 inch strips just like before. CUT ALL THE WAY THROUGH TO THE OTHER SIDE.  This is the step which is different from the other post.


When you're done cutting the strips, you will have loops that look just like this. Perfect!


Watch the video below to see how to connect each loop of t-shirt. Connect all loops together. Once done, pull/tug on the t-shirt pieces to make it 'roll'. You'll end with a long piece of t-shirt yarn to use for future crafts!


Happy crafting!
-Melanie

Friday, April 5, 2013

Yarn: Re-Purposed T-Shirts


Today, as I cleaned through the closets, I found several old t-shirts. Before I bagged them up for Goodwill/Salvation Army, I did a quick Google search for re-purposed t-shirts.  What I came up with was a tutorial for making yarn!

To start make sure you have good, sharp scissors. If you don't, it will make cutting the t-shirt very difficult! Lay out a t-shirt and cut from armpit to armpit. Next, cut the bottom hem off. I have found it works best with shirts without a hem on the sides and with minimal text/designs. Areas with hems and designs are thicker and cause the yarn to not roll evenly with the rest of the material... you'll understand what I mean by 'roll' in a later step. 


 Fold the t-shirt in half so the sides of the shirt go together. Do not put the cut ends together or you'll end up with strips of t-shirt. Leave about a inch of fabric showing (see picture). Also, I said these were old t-shirts. Don't mind the nasty, grimy, armpits shown in the picture! I know, its disgusting... but that's why I was planning on getting rid of the shirts in the first place.


Start cutting the  fabric in about 1 inch strips. I don't actually measure, I just use the knuckle on my thumb to maintain an approximate measurement. Cut the fabric until you reach the fold on the top layer of t-shirt. If you cut all the way across the t-shirt and don't stop, instead of yarn, you'll end up with giant loops of t-shirt... which can also be OK as I will explain in the next tutorial... but for this method, that's not what we want.

 Once done cutting, open the t-shirt up. I slid the t-shirt on my arm to give a better picture.


 To make a long strand of t-shirt yarn, start at the first slit on the bottom and cut diagonally to the second slit on the top. Continue by cutting from the second slit on the bottom to the third on the top... 3rd on bottom to 4th on top... 4th on bottom to 5th on top... you get the picture.


 When you get to the end, you're left with this 'Y' looking thing from the beginning. You can either cut it apart right away, or separate it after you finish cutting the rest of the shirt. I left it until the end just to make it easier to visualize the cutting pattern for the tutorial.


Just cut from the outside (0 slit on the bottom) to the first slit on the top. I don't know why my photo wont rotate counterclockwise for me... but in essence this is what it will look like once you've cut the 'Y'.


 Begin stretching the t-shirt as you wind it into a ball. This is what I was talking about when I said hems and designs on t-shirts make them hard to 'roll'. If you happen to get a portion of a pattern on your yarn, its not the end of the world. Heck, in this tutorial, I even had part of the "CF" mixed in my yarn.


Anyway, keep pulling and stretching the t-shirt and winding it up into a ball. And there you have it, re-purposed t-shirt yarn.


Happy crafting!
-Melanie