
Today, as I cleaned through the closets, I found several old t-shirts. Before I bagged them up for Goodwill/Salvation Army, I did a quick Google search for re-purposed t-shirts. What I came up with was a tutorial for making yarn!
To start make sure you have good, sharp scissors. If you don't, it will make cutting the t-shirt very difficult! Lay out a t-shirt and cut from armpit to armpit. Next, cut the bottom hem off. I have found it works best with shirts without a hem on the sides and with minimal text/designs. Areas with hems and designs are thicker and cause the yarn to not roll evenly with the rest of the material... you'll understand what I mean by 'roll' in a later step.
Fold the t-shirt in half so the sides of the shirt go together. Do not put the cut ends together or you'll end up with strips of t-shirt. Leave about a inch of fabric showing (see picture). Also, I said these were old t-shirts. Don't mind the nasty, grimy, armpits shown in the picture! I know, its disgusting... but that's why I was planning on getting rid of the shirts in the first place.

Start cutting the fabric in about 1 inch strips. I don't actually measure, I just use the knuckle on my thumb to maintain an approximate measurement. Cut the fabric until you reach the fold on the top layer of t-shirt. If you cut all the way across the t-shirt and don't stop, instead of yarn, you'll end up with giant loops of t-shirt... which can also be OK as I will explain in the next tutorial... but for this method, that's not what we want.


Once done cutting, open the t-shirt up. I slid the t-shirt on my arm to give a better picture.

To make a long strand of t-shirt yarn, start at the first slit on the bottom and cut diagonally to the second slit on the top. Continue by cutting from the second slit on the bottom to the third on the top... 3rd on bottom to 4th on top... 4th on bottom to 5th on top... you get the picture.

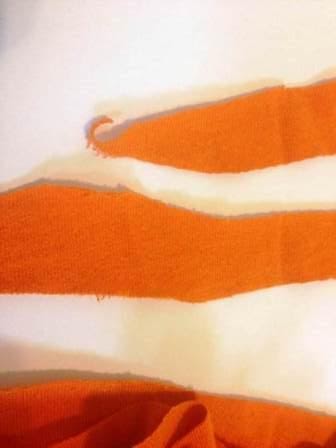
When you get to the end, you're left with this 'Y' looking thing from the beginning. You can either cut it apart right away, or separate it after you finish cutting the rest of the shirt. I left it until the end just to make it easier to visualize the cutting pattern for the tutorial.

Just cut from the outside (0 slit on the bottom) to the first slit on the top. I don't know why my photo wont rotate counterclockwise for me... but in
essence this is what it will look like once you've cut the 'Y'.
Begin stretching the t-shirt as you wind it into a ball. This is what I
was talking about when I said hems and designs on t-shirts make them
hard to 'roll'. If you happen to get a portion of a pattern on your
yarn, its not the end of the world. Heck, in this tutorial, I even had
part of the "CF" mixed in my yarn.

Anyway, keep pulling and stretching the t-shirt and winding it up into a ball. And there you have it, re-purposed t-shirt yarn.

Happy crafting!
-Melanie
No comments:
Post a Comment